Working on a laptop screen is a pain. I find it impossible to get a lot of productive work done on a laptop screen without hooking up an external monitor. Its particularly bad now that I’ve switched to a smaller MacBook Air with a 13.3″ screen from a big ‘ol Dell I was using before. Sure, when I’m traveling I make do on my small 13.3″ screen, but when I’m at a desk, I go right for the cord to connect the 2nd monitor to give myself some more working space.
As part of my transition from PC to Mac, it took some time to get used to the Mac Menu bar as it isn’t always a 1:1 relationship with the Windows Start Bar. Depending on your settings, you may not see a menubar on your external monitor.
Show The Menu Bar On All Monitors
If you’re using an external display with your Mac and you don’t see the menu bar by default, you may want to adjust how the menu bar is displayed so you can show menu bar on all screens. Here are the steps to add or remove the menu bar from an external display:
- Connect your external display to your Mac using the appropriate cable or adapter. Make sure the display is turned on and set to the correct input.
- Click on the Apple menu in the upper-left corner of your screen.
- Select “System Preferences” from the dropdown menu.
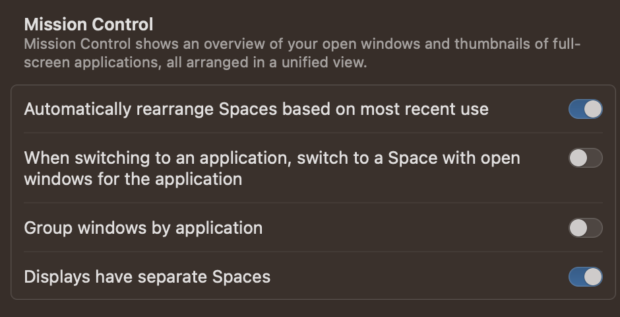
- Select Desktop & Doc and then scroll down to the Mission Control Settings.
- Turn on “Displays have separate spaces”
With the Displays have separate spaces option enabled, a menu bar should now appear on all your screens.
How To Remove The Menu Bar from a Second Monitor
If you don’t want to see the menu bar on your second monitor or TV as you’re making a presentation, you can follow the steps in reverse:
- Connect your external display to your Mac using the appropriate cable or adapter. Make sure the display is turned on and set to the correct input.
- Click on the Apple menu in the upper-left corner of your screen.
- Select “System Preferences” from the dropdown menu.
- Select Desktop & Doc and then scroll down to the Mission Control Settings.
- Turn off “Displays have separate spaces”
This will make it so the menu bar only shows on your primary desktop & space.
Adding The Menu Bar to External Displays on Older Versions of OS X.
Since the default setting on older versions of OS X was to not include a menubar on external monitors I went digging for a solution. What I found was SecondBar, and it does exactly what you’d expect. It adds an additional bar to your external monitor. And, in fact, it seems to support more than just 2 monitors (although I haven’t tested this). If you’ve run it with three monitors, please let us know in the comments.
You can download the software from the developers website here. He says try it at your own risk because its fairly new in its development lifecycle. With that said, I’ve used it now for 2 months with no problems, so I think its worth a shot.