AirDrop is a file-sharing feature that allows users to easily and quickly transfer files between their iPhone and Mac without using cables or other transfer methods. This feature uses Bluetooth and Wi-Fi technology to establish a direct connection between the devices, allowing for faster transfer speeds and a more seamless experience. This article outlines details about enabling Airdrop and how to use it to send files from an iPhone to a Mac.
Interesting Articles
To AirDrop from an iPhone to a Mac, both devices must have their Bluetooth and Wi-Fi turned on. Once these settings are enabled, users can transfer files by simply selecting the file they want to share, tapping the share button, and selecting the receiving device from the AirDrop list. The receiving device will then receive a prompt to accept or decline the file transfer.
How to Turn on AirDrop on iPhone and Mac
To utilize airdrop to send files between an iPhoen and a Mac you need to make sure the feature is enabled on both devices. Luckily, turning on AirDrop is a straightforward process on both the iPhone and Mac.
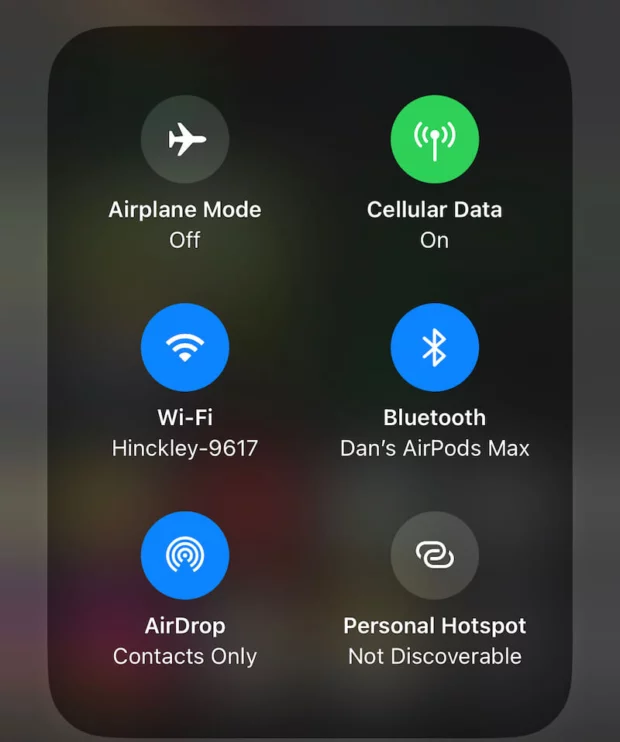
On the iPhone, users can access AirDrop by swiping down from the top right corner of the screen to open the Control Center. From there, they can long-press on the Wi-Fi icon card to bring up the AirDrop menu. Users can then select either “Contacts Only” or “Everyone” to determine who can see their device and send files via AirDrop.
On the Mac, users can turn on AirDrop by opening a Finder window and selecting “AirDrop” from the sidebar. From there, users can click “Allow me to be discovered by” and select either “Contacts Only” or “Everyone” to enable AirDrop.
How to Use AirDrop to Transfer Files Between iPhone and Mac
To transfer files between an iPhone and a Mac using AirDrop, users can follow these steps:
- Turn on AirDrop on both devices.
- On the iPhone, open the app containing the file you want to share and tap the share button.
- From the share menu, select the receiving device listed under “AirDrop.”
- On the Mac, a notification will appear asking if you want to accept the file transfer. Click “Accept” to start the transfer.
- Once the transfer is complete, the file will appear in the appropriate app on the receiving device.

Troubleshooting AirDrop on iPhone and Mac
If AirDrop is not working as expected, users can try the following troubleshooting steps:
- Make sure both devices are within Bluetooth and Wi-Fi range of each other.
- Make sure both devices have AirDrop turned on and are set to “Contacts Only” or “Everyone.”
- Restart both devices and try the transfer again.
- Disable any firewalls or security software that may be blocking AirDrop.
Best Practices for Using AirDrop
To get the most out of using AirDrop files from an iPhone to a Mac, here are some best practices to follow:
- Make sure both devices are running the latest software updates.
- Only use AirDrop with trusted contacts or devices.
- Consider using “Contacts Only” rather than “Everyone” to limit who can see and send files to your device.
- Be aware that AirDrop can drain battery life, so it’s a good idea to only leave it on when needed.
Security and Privacy Considerations for Using AirDrop
While AirDrop is generally considered a secure way to transfer files, it’s important to be aware of potential security and privacy risks. For example, if AirDrop is set to “Everyone,” anyone nearby can see and attempt to send files to your device. Additionally, if a device is compromised, attackers may be able to use AirDrop to send malicious files.
To mitigate these risks, it’s a good idea to only use AirDrop with trusted contacts or devices and to set AirDrop to “Contacts Only” if possible. It’s also important to keep both devices up to date with the latest software updates, as these often include security patches that address potential vulnerabilities.
Finally, it’s worth noting that AirDrop uses encryption to secure file transfers, which means that the files being transferred cannot be intercepted or read by unauthorized parties.
Differences Between AirDrop on iPhone and AirDrop on Mac
While the basic functionality of AirDrop is the same on both iPhone and Mac, there are some differences in the way the feature is accessed and used. For example, on the iPhone, AirDrop is accessed via the Control Center, while on the Mac, it is accessed via a Finder window. Additionally, on the Mac, users can choose to receive files in either the Downloads folder or the desired destination folder.
Another difference between AirDrop on iPhone and Mac is that the maximum file size that can be transferred via AirDrop is larger on the Mac (up to 5 GB) compared to the iPhone (up to 1.5 GB).
A Step-by-Step Guide for Using AirDrop on iPhone and Mac
Here’s a step-by-step guide for using AirDrop to transfer files between an iPhone and a Mac:
- Turn on AirDrop on both devices. On the iPhone, swipe down from the top right corner of the screen to open the Control Center, long-press on the network settings card, and select either “Contacts Only” or “Everyone” from the AirDrop menu. On the Mac, open a Finder window and select “AirDrop” from the sidebar, then click “Allow me to be discovered by” and select either “Contacts Only” or “Everyone.”
- On the iPhone, open the app containing the file you want to share and tap the share button. From the share menu, select the receiving device listed under “AirDrop.”
- On the Mac, a notification will appear asking if you want to accept the file transfer. Click “Accept” to start the transfer.
- Once the transfer is complete, the file will appear in the appropriate app on the receiving device.
In conclusion, AirDrop is a convenient and easy-to-use feature that can help users quickly transfer files between their iPhone and Mac. By following these best practices and taking necessary security precautions, users can get the most out of AirDrop while keeping their devices and data secure.