In the digital era, our memories often reside in the form of photographs stored on our devices. With the ever-growing number of images we capture, organizing them becomes essential. Enter Mac’s Photos app, an intuitive and powerful tool designed for efficient photo management. Let’s delve into how you can use this app to keep your digital memories well-organized and easily accessible.
Interesting articles:
Step 1: Getting to Know Your Photos App
The Photos app on your Mac is more than a simple gallery. It’s a robust platform with features that intuitively sort your photos into sections like Library, Memories, People, Places, and Recents. Familiarizing yourself with these categories is the first step in mastering the art of photo organization.

Step 2: Starting with Your Library
The heart of photo organization in the Photos app lies in effectively using folders and albums. Folders are great for grouping different albums under a common theme, whereas albums are where you categorize your individual photos and videos. For instance, create a folder titled “Family Vacations” and within it, separate albums for each trip. Use the Library tab to browse your photos chronologically by Years, Months, Days, or view your entire collection under All Photos.
Step 3: Enhancing Your Photo Organization
The Photos app’s facial recognition feature simplifies finding and organizing pictures of specific people. Tagging friends and family allows you to view all their photos in one place. Additionally, adding location data to your photos places them on an interactive map, making it easy to relive memories from specific places. Another charming feature is creating Memories – dynamic slideshows of your best shots that bring your past moments to life.
Step 4: Mastering iCloud Photos
iCloud Photos is a game-changer for photo management. By enabling iCloud Photos in your System Preferences, your photo library stays synced across all your devices. This not only makes accessing your photos convenient but also serves as a backup. Remember, iCloud offers 5GB of free storage, but you can always purchase more space as your photo collection grows.
Step 5: Utilizing Advanced Features
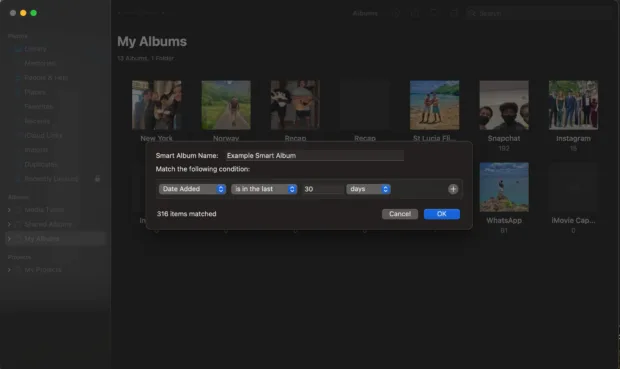
Take advantage of Smart Albums in the Photos app, which automatically organizes photos based on criteria you set. Use the advanced search functionality to find photos based on people, places, or events. Additionally, Shared Albums are a great way to collaborate on photo collections with friends and family.
Step 6: Troubleshooting and Maintenance
Even the best apps can have issues. If the Photos app is not functioning properly, use the built-in repair tool by holding down the Option and Command keys while opening the app. This can fix database inconsistencies and get your app back to working condition. Also, familiarize yourself with common iCloud sync solutions to keep your photo library up to date.
Step 7: Creative Projects with Photos App
The Photos app also allows you to create tangible memories. Easily design photo books or calendars and have them printed and delivered to your doorstep. If you’re importing photos from a camera or scanner, integrate the Image Capture app for a seamless transfer to your Photos library.
Organizing your photo library on a Mac doesn’t have to be a daunting task. With these steps, you can turn a cluttered collection of images into a well-organized library of memories. Dive into these features, experiment, and see how the Photos app can transform your photo management experience.