I have the pleasure of working with two macs. One is a Mac Pro and the other is a first generation MacBook Pro for working remotely. This has been especially helpful given the rise in fuel costs. What has been challenging is keeping the data on the two machines in sync. There are several ways to do this and in this article I will discuss a few different ways.
1. iCloud Syncing
iCloud is a cloud-based storage service provided by Apple that can be used to sync files between two Macs. To use iCloud for file syncing, you first need to make sure that both Macs are signed in to the same iCloud account. You can do this by opening System Preferences on both Macs, selecting iCloud, and entering the same Apple ID and password on both devices. Once both Macs are signed in to the same iCloud account, you can enable iCloud Drive syncing on each device.
To do this, go to the Apple menu, select System Preferences, and then click on iCloud. Make sure that the checkbox next to iCloud Drive is checked on both Macs. Next, you will need to create a folder in iCloud Drive that you want to use for file syncing between the two Macs. You can do this by opening Finder on one of the Macs, clicking on iCloud Drive in the sidebar, and then clicking on the New Folder button. Give the folder a name that will help you remember what it’s for, such as “Synced Files.”
Once you have created the folder, you can copy files to it on one of the Macs, and they will automatically sync to the other Mac as long as both devices are connected to the internet. Any changes you make to the files in the synced folder on one Mac will be reflected on the other Mac as well. By using iCloud to sync files between two Macs, you can easily keep important documents, photos, and other files up to date and accessible on both devices.
2. Time Machine Synchronization

Apple created Time Machine so you would never lose a file, which makes it a good candidate to keep files in sync. In this case, You use your external drive with Time Machine to keep backups of each machine. When you switch machines you would then restore from the Time Machine backup of the other machine. There are two ways to access Time Machine backups of different machines (on the same drive). The first is to hold down the option key after you have clicked on the Time Machine menu icon

The other way is to right click the Time Machine icon in the doc:

Clicking on either option will bring up a dialog where you can choose which Time Machine Backup to use. After that point, Time Machine behaves just as before and you can restore any file or folders as you normally would.
In my case, all of my important files are in my Documents folder and each morning when I changed machines, I would restore the Documents folder from the other machine’s Time Machine backup. Time Machine is effective, but not the brightest program when it comes to restoring files. Time Machine copies over everything, even files that that are identical on the machine and the backup. My Documents folder was just over 4 gigabytes in size and this took Time Machine about 10 minutes to restore on my macbook pro using a USB cable. The Mac Pro was faster as it has firewire 800.
Because Time Machine copies over everything from the backup to the new machine, that meant that every file in my Documents Folder had changed and Time Machine would then backup the entire Documents folder again. Backuping up the same data over and over each day quickly filled up my external drive.
Yet I found that keeping just the Documents folder in sync wasn’t quite enough. My iTunes folder was now scattered across two Macs along with photos and applications. Adding those folders to Time Machine would cause my drive to fill up even faster.
But this path had one final flaw which was human error. Time Machine gives you the sense of security that everything has been backed up. But that’s only true each time Time Machine successfully runs. So it does you no good to quit 1 minute before a scheduled backup. This leaves Time Machine without that last hour’s worth of work. So the flaw was forgetting to run Time Machine’s backup before quitting for the day which unfortunately is all too easy to do.
Bottom line: It does work but be sure to have lots of space and never forget to backup
3. Network Based Synchronization

While there are quite of few online places to keep files in sync, including drop.io, it’s not allowed at my company. In talking with one of our IT guys, he mentioned that I could use something called rsync. I learned that rsync is an app that comes with OS X, but you have to run it from the Terminal (i.e. command line). Some of us use Macs to get away from all that “Unix-y” stuff. On the other hand, rsync can copy only the files that have changed and it can do it over the net through a secure encrypted connection. rsync can also sync up local folders too but that’s not as interesting.
In order to get this to work, you first have to enable remote login from the Sharing section of system preferences.

The next part is determining whether or not you can connect to your Mac from your remote location. This might include talking to your IT staff, wrangling with your ISP and adjusting settings on your home router/DSL or cable modem. Those issues are beyond the scope of this article. Here’s an example of what using rsync looks like:

As you can see, there’s a lot of options for rsync, and this method by far is the most technical and detail oriented. You can easily sync up the wrong folder, or the right folder to the wrong location on the remote machine. However, when it is done right, rsync works fast and secure.
As with Time Machine above, keeping my Documents Folder in sync worked fairly well. But my iTunes library is even larger than my Documents folder and syncing changes would take too long especially after downloading a movie. Also, if the remote machine unexpectedly becomes unavailable before you are able to sync up the files you get to make an unplanned trip to the office.
Bottom line: It does work as long as you don’t mind getting through all the technical details and the net. Head on over to the forum if you want to know more.
4. Shared Home Folder

Back when Tiger first came out, there was talk that Apple would let people store their home folders on their ipods. That never quite happened. Again, with Leopard, there was talk that Apple would bring that back. While I don’t know about the iPod, you can move your Home folder to a remote drive. The idea of course, is to keep the home folder in sync between two machines because both machines use the same home folder. This eliminates the human error portion of remembering to backup or restore. Again, this has some technical steps, but the end result so far seems to be much better.
First, make sure your external drive is formatted properly. Apple uses the HFS+ filesystem, most external drives are formatted for use with PC’s. You can use the Disk Utility App to reformat your drive or a part of it to Apple’s filesystem.
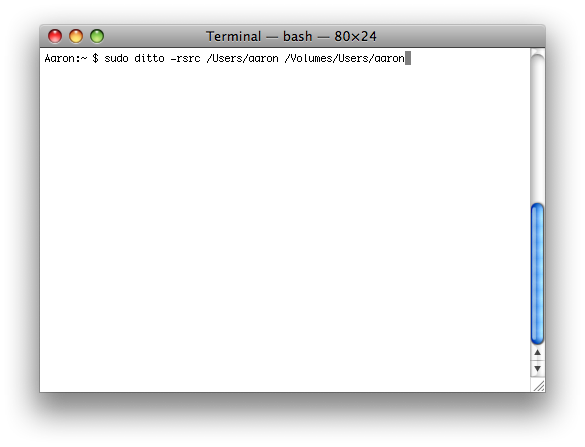
Once you have the drive formatted and connected to your mac, then you’ll want to copy your home folder to it. To do that, you will need to use the Terminal and a command called ditto. Open Terminal and type: sudo ditto -rsrc “/Users/username” “/Volumes/new_home_folder_path”
where username is your account’s short name and new_home_folder_path is where you want your new home folder to be. For example, the caption below shows me copying my home folder to /Volumes/Users/aaron.
You will be prompted for your password (you have to do this logged in an administrator account) and the copying will commence. ditto will create the new folder if it doesn’t exist which is nice. This is the most techie part of the process.
Next you need to open System Preferences and click on Accounts. Then click the padlock at the bottom left and enter your password whem prompted. Now right-click on your account name and a menu “Advanced Options…” should appear.

Clicking on Advanced Options will take you to a screen where you can change your home folder’s location. Do note the giant warning at the top of the window. Changing these settings can really mess things up. As always, proceed with caution.

You can click the “Choose” and select the folder you want for your Home folder or if you’re really brave, you can just type it. Once you have chosen your new home folder’s location, log out and restart. If everything went well, logging in will look like before. If everything didn’t go well, you’ll get an error. I set up a second administrator account so I could change things back in case something went horribly wrong. Luckily, it didn’t. Repeat the process for each machine.
Now I don’t have to synchronize anything anymore as it is all stored in one portable location. There have been a few quirks. Time Machine doesn’t like it and it causes backups to fail. So you should have some backup plan in mind when the external drive fails (and it will). Also, some apps behaved as if they were freshly installed and prompted me for their license keys. But all in all, it has worked out better than the other two options.
Bottom line: Most convenient option but also the easiest to completely mess up your Mac